30/08/2021

The Clothespeg Paddle V2.0

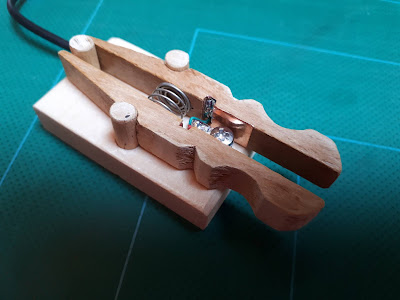
ON7DQ Clothespeg Paddle V2.0


In April 2017 I built my first "clothespeg" paddle. It was more of a joke, as a reaction to this thread on the SOTA Reflector.

https://reflector.sota.org.uk/t/homebrew-mini-cw-paddles-and-video/15044/

The idea for the use of wooden dowels came from Ignacio, EA3BD, and the idea for the clothespeg actually came from John, G4YTJ.

To my surprise, the paddle worked quite well, and I used it for some SOTA activations in EA6. Later on, I also used the paddle with all of my QCX rigs, during the different QCX QSO Parties.


But when working no one else than EA2BD who was doing a SOTA activation (and I was operating from the beach with my QCX Mini), I began to get erratic keying, and after investigating, it seemed that the self-adhesive copper foil I used was being pulled loose by the wires. Because I soldered the wires a bit too close to the center pillar, it began making contact even when I did not touch the paddle.

There was another flaw in my first paddle, the wooden dowels holding the pegs were mounted perfectly vertical, but that way  the paddle would slowly work itself upward and become loose, so I had to make a "top cover".

So it was time for V2.0 !

The following pictures will give you a good idea of how to make one for yourself, it's not complicated at all.
Making the base


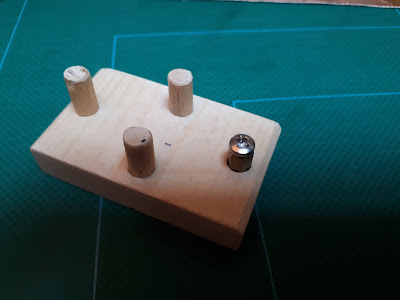
I took a piece of wood approx. 57 by 34 mm, and 10 mm thick. See some dimensions in the drawing below. You may have to change some measurements, because well ... not all clothespegs were created equal, hi.


On the front to back centerline, drill two holes, the size of some wooden dowels. I used a 6 mm drill, which made the dowels press-fit.

You'll need three dowels of about 25 mm long. I used a chopstick to make the dowels.
In my first paddle, I used also a wooden dowel for the ground contact, clad with copper foil. But this time I use a hexagonal standoff (from the junkbox), which allso presses into a 6 mm hole, and used an eyelet and a screw.

The two "side dowels" are slightly tilted inward, by putting a small piece of cardboard under the opposite side when drilling the holes.

To measure where to drill the holes for the two side dowels, I put two pieces of cardboard, 1 mm thick between the paddles, so my contact spacing would be about 1 mm, which is fairly wide. You can adjust that spacing later, see below.

Two pieces of self-adhesive copper tape were put in the appropriate places. Again, this may differ from model to model.
If you have no such copper foil, you may glue two thin copper or tinned plates to the paddles, like the screening plates of a TV tuner, cut some metal from a Coke can, etc. Use your imagination.

Clothespeg becomes two paddles


I also found a rather sloppy spring in my junkbox, probably from the battery compartment of a toy.
One end was bent over and pressed in a 0.8 mm hole in the left paddle. I drilled another 0.8 mm hole in the other paddle, just for the picture, to show the position of the hole.

Then came the connecting cable. I cut a 3.5 mm stereo cable in two. I drilled a 3.5 mm hole right behind the center post. Then with some luck, and careful aiming ... I could drill another 3.5 mm hole from the back, horizontally through the base, and it ended in that first hole. Some fiddling with fine tweezers ...and I pulled the three wires of the cable through the hole.
The ground contact is soldered to the eyelet on the center post. The other wires are soldered to the copper foil, in the small indent in the paddles, where I also pushed some foil into.

Cable and spring inserted, ready for assembly !


The whole assembly with the spring slides just between the two middle dowels, and needs no other fixing. The weak point will probably be the flexing wires to the paddles, but that is easily repaired.

If you think the spacing is too wide for you, it can be adjusted by slipping a piece of shrink tubing, or the rubber piece of a mini crocodile clip, etc .. over the back pillar. See two examples below.
You could even make an oval shaped back pillar that you turn around to have a continously adjustable spacing, but I wanted to keep things simple!


Adjusting the contact spacing


Here you see the paddle in action during it's first test this afternoon, during the QCX Challenge.
I made 4 QSO's with it, and made very few errors.   


When all is to my liking, I may fill the holes of the center post and the hole for the cable with some two-component epoxy.

Have fun !

73,

Luc ON7DQ

16/08/2021

OST Morse Box DG - ON7DQ Version


The OST Morse Box project started in april 2020, see my original post about it here

Since then, a lot has happened. 
I wrote several articles about it, they were published in various printed and online magazines, in Dutch, French, German and English. Soon there will be a Spanish article too.

The basic instruction manual is available in Dutch, English and Spanish.

All info on the basic version can be found on github.

Meanwhile, Gil ONL12523 kept on programming ... and the result was an expanded version, called the OST Morse Box DG. It included a decoder and a basic sine wave generator for test purposes, and for adjusting the decoder. The built-in keyer was expanded with iambic A and B modes.

Info for this expanded version is on another github page here.

I built the first prototype on a single sided PCB, where Gil had made the "top plane" with wires ... and it worked (of course !). In a hurry I built it into a plastic cigar box.
Not really a very attractive thing ...


Recently I was looking for a new project, and thought, why not rebuild the Morse Box, but now with all the possible bells & whistles, so as to have a nice looking "presentation model".

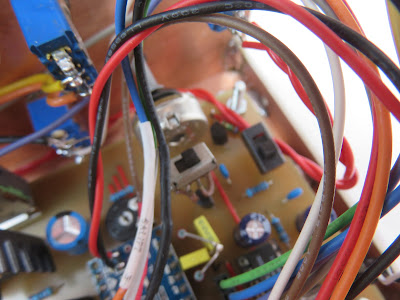
So this is the result of my work, see top picture.
My box has the basic PCB (left side of the front panel), and the two different decoders with controls (right side of the panel). 

Added features are : switches for Power, PTT disable, decoder selection (PLL or BPF), selection of input signal : internal (from the VHF/UHF transceiver) or external (e.g. from an HF transeiver).
An LED as a tuning aid for decoding signals with the PLL decoder.

Internally I added two small slide switches, one to disable the power bank "keep alive" feature, which generates a ticking noise. And one to short out resistor R7, to increase the MIC level for Yaesu transceivers. 

Two pushbuttons were also added, one for switching the decoder ON or OFF, and a RESET button on the back panel. As I was looking at the decoder ON/OFF button, I thought it would be nice if I could also start the generator with that button, so I asked Gil if that would be possible?

Of course it was, so there is now a version 2.12 of the Arduino firmware, where the decoder button works as follows (supposing the decoder was ON) :
> Decoder OFF > Generator ON > Generator OFF and Decoder back ON.
Those that don't want any decoders, can touch the key or paddle to switch OFF the generator, this will also leave the decoder in the OFF state.

Here follow some more details. Click on the pictures to see them in a better resolution.

I started by cutting a few pieces of single sided PCB. The dimensions of the box were inspired by the size of the front panel of an IC-9700, so that the box can be put nicely on top of it : it's 9 by 23 by 9 cm (H/W/D)


I soldered the back panel to the bottom panel, and added two side strips, where I could fix the cover using small Parker screws.

The front panel was soldered after most of the insides were mounted.

Drilling and filing all the holes was a lot of work, especially measuring the correct position !

But after a while , it started looking like this. There are 19 holes in the front, and 10 in the back !


The front panel was again removed and all sides were spray painted with two layers of a light gray matte finish.

Then all the labels were put on, just using Scotch tape, nothing fancy.

I tried using a clear spray varnish on a test panel, where I fixed some labels with Pritt glue, Velpon glue or Scotch tape.
I was not a big success, rather one big failure ...
The chemicals in the varnish (aceton ?) did no good to the toner from the printer, and where I used Scotch tape it affected the edges of the tape.


Two points which you may find interesting, is how I mounted the decoders and the OLED display.

The two decoder boards were mounted just hanging from their potentiometers. I made a kind of "brigde" with three holes for the potentiometers. The bridge is then soldered to the front panel, so you don't see any nuts on the front panel, and I had only to drill three small holes for the 4mm shafts.


Same principle for the OLED display. Two supports left and right of the display support a "bridge", which has adjustable slots, so that I can put some pressure on it. A piece of soft rubber insulation (from a test lead) makes sure I don't crack the display board, or short any components it may touch.


On the picture above you can also see the two small slide switches (near the top right), an internal speaker (bottom left) and the RESET pushbutton (bottom right).


Here is a close view of the front panel. 


The two switches for RANDOM and BEACON are of the special ON-OFF-(ON) type as suggested in the basic manual. This means they function as a pushbutton when pushed down (non locking), and as a switch (locking) when pushed upward.

It also contains a built-in Touch Paddle (bottom right).
The paddle was made after the description in the basic manual. The ground strips were soldered to the bottom plate of the case.

And this is the back panel.


Most of the connections are on the PCB of the basic version. The extra stuff is : EXT IN, to connect signal from an external receiver to the decoders. A DC 12V power input, feeding the 7808 voltage regulator on the PCB. The RESET button. 

Finally, a cover was made from an old cover from a server. It was cut and bent into shape, and spray painted with two layers of red paint. 

ꙮꙮꙮꙮ

While rebuilding the OST Morse Box, I also did a few small changes.

When using headphones, one may notice the computer noise from the Arduino and/or connected PC.
Adding a 47µF/10V electrolytic capacitor between pins 7 and pin 4 (GND) on the LM386 solves this problem (any value between 10µF ... 100µF will do).


Adding a switch to disconnect R12 from 5V, to disable the keep alive circuit.

Adding a switch to short out R7 to increase the modulation level for Yaesu transceivers.

Replacing the fuse I put in earlier, by an LM7808 voltage regulator. A heatsink was not necessary, but I put one anyway.

At the jumper block, I added test points (stiff wires) to connect GND, +5V, and Signal IN for the decoders. I could solder to these points even after the PCB was mounted in the case.

The 12V DC input is connected to pin 17 on the jumper block, named +9V in the manual.

Pin 19 on the jumper block, the PTT signal,  is routed over a switch on the front panel, and then to the transceiver PTT line. This is handy if you want to do some code practice without transmitting, but still want to be standby on the local channel for a voice QSO.  PTT from the microphone will remain functional.


Finally the decoder switching was done according to this diagram.


The SIGNAL switch selects between the audio from the VHF/UHF transceiver or an external source, and feeds both decoders at the same time. Both decoders are also supplied with +5V all the time

The second switch selects which decoder will be used.
Only one of the decoders' output is connected to Arduino input D2 (on the paddle test jumper).
The LED output is also switched.


It may all seem a rats nest in the end, but when the lid is on, it looks really nice ... what do you think ?

73,

Luc ON7DQ

24/02/2021

Sunniest Winter Bonus Points Ever


Predictions for Wednesday Feb 24th were excellent, sunshine all day and temperatures up to 18 °C, so I had to grab this opportunity.

Leaving my home QTH at the unholy hour of 05:25, I arrived almost three hours later on the first summit, ON/ON-001. I took my breakfast on a parking spot along the road.


ON/ON-001, Signal de Botrange - 695m, 8 points

Setting up on the parking lot (position 50.501208, 6.093355) was not easy, no way you can get any pin in the ground there, it’s all rocks.So I used part of a fallen tree to support my fishing pole, and installed my “long endfed”, 23m of wire with a 9:1 UNUN.


Last time I was on this summit (in Dec 2020), that UNUN showed a bad contact, making me call CQ on a piece of coax only 3.5m long … still Lars, @SA4BLM picked up my signal at 339, amazing.

I had checked the UNUN at home and couldn’t find anything wrong with it. But again, it behaved badly, it seems the BNC connector got loose and started turning a little, but by fiddling a little I could get it working, and had no more problem on the other summits.

To please the ON stations, I started on 80m CW. But who was the first caller? SA4BLM, him again, hi. I think Lars sleeps at his transceiver (or maybe his transceiver is next to his bed ?).

After logging 9 stations in CW and 10 in SSB, I moved to 40m, resulting in a small pile up, 32 more QSO’s in the log, including 2 S2S. A nice result, 51 QSO’s in 50 minutes, I can live with that.

Since it is now forbidden to leave Belgium, I had a walking track from the Belgian side to the summit ON/ON-009 (Iverst) from Peter, ON4UP. He had done this walk on the Monday before, but I decided that I would lose too much time and skipped this one.


ON/ON-011, Sur Clair Fa - 601m, 8 points


From my parking spot at position 50.319998, 5.972385, I walked 5 minutes to the East, to my operating spot at 50.320594, 5.976140, which is just in the AZ.

Again using the long endfed, I started on 80m and got 9 callers. In between, I catched a few S2S on 40m. That is the main reason I use this non-resonant endfed, change band, press autotune and GO.


After that I went to 60m SSB (8 Q’s), 40m SSB (7 Q’s) and ended with 30m CW (2 Q’s). I had to stop then, because I was already one hour behind on my schedule.

BUT, I gained some time by trying out a new parking spot for my next summit, ON/ON-013.


ON/ON-013, Bois de Hodinfosse - 568m, 6 points


I have activated this summit 4 times before, using the parking spot indicated by G4OBK, and then walking a steep slope for 30 minutes.


I had seen on the maps that in the village of Arbrefontaine, one can drive the road called “Le Calvaire” to a much higher altitude than I used to do. Now take care, because almost all roads are called “Le Calvaire” over there, hi … see map below (source: Google Maps).

If you see this view to your right , you know you have the “right” one, although technically it is the “left” road on the map, hi.


The white structures are the stations of a Calvary or "Way of the Cross". More info about them is here (in French): 

At the start of the road, there's a sign saying it is a dead end street, but you can drive this road to this parking spot 50.316070, 5.841752, turn your car and park at the downward side.

From there it is less than 500m walking to this operating position 50.314296, 5.848018.
It is a much easier walk, with only 25m ascent, and the operating spot is at 560m, so well into the AZ.
From there, you also have a nice view over the area below since it is an open field.


On this summit, I wanted to try my new QCX Mini, a 17m model. 
See my posts about this little marvel here and here and here.

Power was from a 3-cell battery box, the antenna a half-wave “Fuchs” antenna (length 8.9m), sloping from abt. 6m above ground to 0.5m (tied to the arm of my chair … ensuring “armchair” copy, hi).
A 4m counterpoise completed the setup.


The Fuchs tuner plugs directly on the QCX Mini, so no feedline losses. I didn’t have any RF feedback problems like others reported, but I did notice a “raspy” sidetone that I don’t have using the rig at home on an external antenna. An advantage of this is that the raspier the tone, the better my Fuchs tuner is tuned, no need to look at the LED.

First I called on 18.092 , but despite being spotted on SOTAwatch, I got only one reply, from UR5IRM, who gave me a 559. More calling … NIL replies. The band was probably not at its best, so it was time for plan B.

Adding 2.2m of wire to the antenna, and retuning my Fuchs tuner, I started CQ’ing on 14.062, with reduced power of 4W, and reduced RX sensitivity of about 1 S-point.

I almost fell off my chair when the first reply was from no one else than … ZL1TM, Andrei in Auckland, New Zealand ! 
He was a good 539 with me, and he gave me a 509.
That was the first ever ZL in my SOTA activator log. WOW.

Further QSO’s with OH5RP, EA5K, EA7GV, OH6JUM, EA7TG, SV2OXS and YL2TQ proved that “abusing” a QCX on the “one lower” band is certainly feasible.

To please the non-CW chasers, I switched to the KX3 + my short endfed (9.15m) to calll a bit more on 40m SSB, and ended the activation with 21 QSO’s in the log, including 2 S2S.


ON/ON-010, Baraque Fraiture - 651m, 8 points

Last summit of the day was another “parking lot” operation at ON/ON-010, parking position is 50.253133, 5.731574 .

Had there been snow, that lot would have been full, but now it was as empty as can be, and parking was free. The temperature was a nice 18.5 °C.

I set up my short endfed again, and filled my log with another 26 QSO’s on 20/30/40/60m, mixing SSB and CW. And then it was time to take the long drive home.


Some statistics:

I drove my car for a total of 6 hours and 50 minutes, and I was out in the open for 7 hours and 5 minutes, of which I played radio for 3 hours and 50 minutes.

Total driving distance 588 km, using up almost a full tank of gas, costing about 55€.

Activator points +42 (now at 1299), S2S points +64 (now at 3333), and Chaser points +52 (now at 15269)


And that concludes my report of a most enjoyable SOTA day trip

73,

Luc ON7DQ

06/01/2021

Even more fun with the QCX Mini ...


OK, Hans thinks I have a FUSE fetish, but I'm also obsessed with using the QCX (Mini) on the "one lower" band without too much trouble. If I can get something for FREE ...

I don't want to modify the QCX inside (except for that FUSE! haha), partly scared to brick it , but also to keep it in its' "mint in box" condition.

One possible problem was the 2nd harmonic suppression when I use the 17m Mini on 20m (see my measurments page here ). I don't think it is a real problem if your QRP rig has a second harmonic 39 or 43 dB below the carrier, the potential interference will be very low anyway.

But ok, I had to investigate if something could be done about it, so I did a few experiments.
Of course, everything had to be as cheap and simple as possible.

First experiment : an outboard LPF for 20m

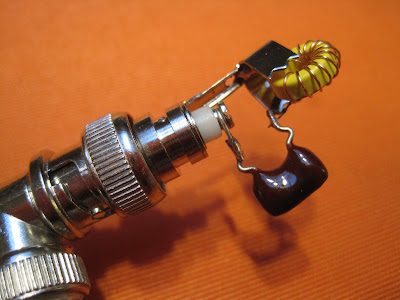
I happened to have two suitable BNC connectors, one a male PCB mount connector (found those in China), and a right angle female BNC (junkbox).

The filter is a simple 3-element LPF, existing of 2 x 180 pF capacitors, and 15 turns on a T37-6 (meaured L was 675 nH). I used wire from the QCX Mini kit, I still have plenty, since the supplied wire should be sufficient to wind a T1 for 80m.

I first prepared a small piece of PCB with a Dremel tool, and drilled all the holes. 


Then mounted the components and  connectors. 

TIP: to solder those connectors, you need a fair amount of heat. Put a matching BNC in them while soldering, especially those Chinese connectors don't contain a Teflon, but a simple white plastic insulator. How I know ? Well, you know  ... hi. 


This is the filter response. Nothing spectacular, but the extra 11 dB suppression should do the trick.
An extra loss of 0.34 dB on 20 m was not so welcome, I had only 4 W on 20 m to start with ...


Still, let's try the LPF in combination with the QCX Mini ...
See picture at the top, the filter is very small, and fits nicely on the side of the QCX Mini.
I didn't put it in a box, but I could wrap it up in rubber tape if needed.

This is what comes out of this setup.


The power drops to 3.22 W, I guess that is still enough to make a QSO, and it's plenty of power if you want to do some WSPR or QRSS. 
The good news is that all harmonics are now more than 58 dB below the carrier!
To know that you obey all the rules is such a good feeling isn't it? 😁

Now, will I use this filter for real ? 
Hmm, probably not!
If I leave the filter plugged in by accident, and I start transmitting on 17m, I will get a high SWR and low output power, possibly ruining the QCX, and not making many QSO's.
So let's try something else ...

Second experiment: harmonic suppression with a series L/C circuit.

What if we could remove the 20m harmonic by shunting it with a short circuit, and leave all the rest untouched ?

That's what a series L/C network does, if tuned to 28 MHz, and put in parallel on the QCX output.
OK, let's make one.

Another T37-6 ringcore, winding it with 13 turns (YES, still with wire from the QCX Mini kit!), measured inductance abt. 500 nH.
A 47 pF capacitor in series, and all was mounted on a cheap, solder type BNC connector.


Using the nanoVNA for a quick check showed that I could easily tune the L/C to 28.1 MHz by shiftng a few turns on the ringcore (note that the nanoVNA was not calibrated, it shows 10 dB loss in the passband).


[NOTE: on the SOTA Reflector Pascal, VK2IHL showed how it should really be done, with a "2nd Order Legendre Bandstop Filter, mainaining 50 Ohm all the time ... read that post here 
Now that is a mouthful, and also defies my principle of cheap and simple ... hi]

This circuit will of course also have some effect on the signals at 14 and 18 MHz, but how much?
One way to find out is to try it.
And what I got was a big surprise!
Here the measurement, transmitting at 14.060 MHz.


At Vcc = 12 V, I got MORE power out, it went from 4 W to 5 W, WOW!
And the harmonic was -62 dBc, so very good.

But what at 18 MHz ?


There, the power dropped from 6 W to only 5 W.
The harmonic suppression remained at -57 dBc.

Of course it’s not all glitter and gold … there is another problem popping up now:
SWR gets worse by adding the circuit.

Putting the QCX on a dummyload, I got an SWR = 1 of course (*).
Adding the circuit on the BNC T-piece gave a higher SWR of 1.2 on 14 MHz and 1.45 on 18 MHz.
Not dramatic, but also not very good.

One advantage: it won’t hurt (too) much if you let the circuit in place for 18 MHz, but of course it would be better to remove it, both Power- and SWR-wise.
And it is surely better than letting my 14 MHz LPF in place and start transmitting on 17m.

Conclusion 

In my opinion, the second solution is cheap, simple and the most desirable one, to make your QCX (+/Mini) into a dual-bander, with reasonable output power, harmonics within spec, and a slightly lower RX sensitivity on the "one lower" band (see previeous post on Measurements here). 

I hope you found my musings interesting, all comments welcome!

73,
Luc, ON7DQ
.


01/01/2021

¿Qué es SOTA?

 ¡Bienvenido! 

Probablemente aterrizaste en esta página porque me viste en una montaña y escaneaste un código QR para obtener más informaciónes.


Estaba ocupado con mi equipo de radio y lamento no haber podido tomarme el tiempo suficiente para explicarles lo que estaba haciendo allí.

Soy un radioaficionado, mi indicativo de llamada es ON7DQ, y lo más probable es que me estuviera comunicando con otro amigo de la radio en algún lugar del mundo.


Tal vez solo tenías curiosidad: "¿Qué hace una caña de pescar en la cima de una montaña?"

La caña de pescar que viste es parte de mi sistema de antenas.
Mantiene un cable delgado en el aire, y con esa "antena" puedo contactar a otros radioaficionados con código Morse, o simplemente hablando en un micrófono.

¿Por qué no usar un teléfono o WhatsApp?

¡Porque es divertido! Y también porque es independiente de cualquier red telefónica o de internet.  Funciona con baterías, por lo que incluso funciona cuando hay una falla de energía.
Debido a esas baterías, la potencia de mi radio es limitada, algo entre 5 y 10 Vatios, no mucho más que una luz clásica de bicicleta.

A pesar de la baja potencia, los contactos en toda Europa son posibles, y con algo de suerte, incluso con otros continentes. Depende de la hora del día, la actividad del sol, el llamado "clima de radio".

¿Es la recepción en una montaña mucho mejor?

La mayoría de las veces lo es. No solo por la altura, sino también por el hecho de que hay menos interferencia de dispositivos electrónicos como en casa.

Pero esa por sí sola no es la razón por la que alguien lleva su equipo de radio a una montaña. También se trata de la alegría de caminar y estar al aire libre. Además, el cultivo de amistades, porque muchos "operadores de radio de montaña" se conocen desde hace años. 

Senderismo de montaña + radio = SOTA = Summits On The Air


Es una variante al aire libre de la afición de la radioafición.  Los radioaficionados llevan sus radios, baterías y antenas a una montaña y desde allí hacen contacto con amigos que están esperando a sus compañeros de montaña, ya sea en otra cumbre o en su estación de radio de casa.


Reglas del juego:

1) ¡El cuidado de la naturaleza es una parte integral de SOTA! Nunca dejamos nada en una cumbre sino nuestros pasos.

2) La radio no debe estar conectada a la red eléctrica o a un generador de combustible, ni ser operada desde un automóvil. Debe ser una verdadera estación "portátil". 

3) La estación en la cumbre y aquellos que hacen contacto por radio con ella reciben puntos por ello.  El logro de 1000 puntos se considera un hito significativo y a menudo se celebra en la comunidad. Encontrar la posición correcta de la cumbre a menudo implica el uso de un GPS como en Geocaching, donde también se pueden acumular puntos.

¿Quién inventó este juego SOTA? 

SOTA fue lanzado en marzo de 2002 por radioaficionados en Inglaterra y Gales. Ahora hay más de 10.000 radioaficionados en todo el mundo que comparten esta afición.  

Ver http://www.sota.org.uk

¡Gracias por su interés!

What is SOTA ?

Welcome!

You probably landed on this page because you saw me on a mountain and scanned a QR code for more information. I was busy with my radio equipment,  sorry that I couldn’t take enough time to explain to you what I was doing there.


I'm a radio amateur, my call sign is ON7DQ, and most likely I was communicating with another radio friend somewhere in the world.


Maybe you just were curious: "What is a fishing rod doing on a mountain top?"

The fishing rod you saw is part of my antenna system. It keeps a thin wire up in the air, and with that “antenna” I can contact other radio amateurs with Morse Code, or just by speaking into a microphone.

Why not just use a phone or WhatsApp ?


Because it’s fun ! And also because it is independent of any phone network or the internet.
It runs on batteries, so it even works when there is a power failure.

Because of those batteries, the power of my radio is limited, something between 5 and 10 Watts, not much more than a classic bycicle light. Despite the low power, contacts all over Europe are possible, and with some luck,  even with other continents. It depends on the time of day, the activity of the sun, the so-called “radio weather”.

Is the reception on a mountain so much better ?

Most of the time it is. Not just because of the height, but also due to the fact that there is less interference from electronic devices, like there is at home.

But that alone is not the reason why someone carries their radio equipment up a mountain. It's also about the joy of hiking and being in the open air. In addition, the cultivation of friendships, because many "mountain radio operators" have known each other for years.

Mountain hiking + radio = SOTA = Summits On The Air


It  is an outdoor variant of the hobby of amateur radio.

Radio amateurs carry their radios, batteries and antennas up a mountain and from there make contact with friends who are waiting for their mountain mates either on another summit or at their home radio station. 

Rules of the game:

1) Caring for nature is an integral part of SOTA! We never leave anything on a summit but our footsteps.

2) The radio must not be connected to the mains power or a fuel generator, or be operated from a car. It must be a true “portable” station. 

3) The station on the summit and those who make radio contact with it receive points for it.
The achievement of 1000 points is considered a significant milestone and is often celebrated in the community. Finding the correct position of the summit often involves the use of a GPS like in Geocaching, where one can also collect points.

Who invented this SOTA game?

SOTA was launched in March 2002 by radio amateurs in England and Wales. There are now more than 10,000 radio amateurs worldwide who share this hobby. 

More information can be found on http://www.sota.org.uk

 Thank you for your interest!

73 ! ( a shorthand code often sent to the other station, meaning "best wishes")

Luc ON7DQ

Qu'est-ce que c'est la SOTA ?


Bienvenue!


Vous avez probablement atterri sur cette page parce que vous m’avez vu sur une montagne et scanné un code QR pour plus d’informations. J’étais occupé avec mon équipement radio et désolé de ne pas avoir pu prendre assez de temps pour vous expliquer ce que je faisais là-bas.


Je suis radioamateur, mon indicatif d’appel est ON7DQ, et très probablement je communiquais avec un autre ami radioamateur quelque part dans le monde.

Peut-être étiez-vous simplement curieux: « Que fait une canne à pêche au sommet d’une montagne? »

La canne à pêche que vous avez vue fait partie de mon système d’antenne. Il maintient un mince fil dans l’air, et avec cette « antenne », je peux contacter d’autres radioamateurs avec le code Morse, ou simplement en parlant dans un microphone.

Pourquoi ne pas simplement utiliser un téléphone, Skype ou WhatsApp ?
Parce que c’est amusant ! Et aussi parce qu’il est indépendant de tout réseau téléphonique ou d’Internet.  Il fonctionne sur piles, donc il fonctionne même en cas de panne de courant.

À cause de ces batteries, la puissance de ma radio est limitée, quelque chose entre 5 et 10 Watts, pas beaucoup plus qu’une lampe de vélo classique. Malgré la faible puissance, des contacts dans toute l’Europe sont possibles, et avec un peu de chance, même avec d’autres continents. 
Cela dépend de l’heure de la journée, de l’activité du soleil, de la soi-disant « météo radio ».

La reception sur une montagne est-elle tellement meilleure ?

La plupart du temps, c’est le cas. Non seulement à cause de la hauteur, mais aussi du fait qu’il y a moins d’interférences dues à des appareils électroniques comme à la maison.

Mais ce n’est pas seulement la raison pour laquelle quelqu’un transporte son équipement radio en haut d’une montagne. C’est aussi la joie de faire de la randonnée et d’être en plein air. En outre, la culture d’amitiés, car de nombreux « opérateurs de radio de montagne » se connaissent depuis des années.

Randonnée en montagne + radio = SOTA = Summits On The Air


C’est une variante extérieure du passe-temps radioamateur.  Les radioamateurs transportent leurs radios, leurs batteries et leurs antennes sur une montagne et de là prennent contact avec des amis qui attendent leurs compagnons de montagne soit sur un autre sommet, soit à leur station de radio à domicile.

Règles du jeu :
1) Prendre soin de la nature fait partie intégrante du programme SOTA !
Nous ne laissons jamais rien d’autre sur un sommet que la trace de nos pas.
2) La radio ne doit pas être connectée au secteur ou à un générateur de carburant, ni être utilisée à partir d’une voiture. Il doit s’agir d’une véritable station « portable ».  
3) La station sur le sommet et ceux qui entrent en contact radio avec elle reçoivent et donnent des  points pour elle.  L’atteinte de 1000 points est considérée comme une étape importante et est souvent célébrée dans la communauté.
Trouver la position exacte du sommet implique souvent l’utilisation d’un GPS comme dans Geocaching, où l’on peut également collecter des points.

Qui a inventé ce jeu SOTA ?  

Le programme SOTA a été lancé en mars 2002 par des radioamateurs en Angleterre et au Pays de Galles. Il y a maintenant plus de 10 000 radioamateurs dans le monde qui partagent ce passe-temps.

Pour plus d'informations, voyez  http://www.sota.org.uk

Merci de votre intérêt!

SOTA ...was ist das überhaupt?


WILLKOMMEN!

Sie sind wahrscheinlich auf dieser Seite gelandet, weil Sie mich auf einem Berg gesehen und einen QR-Code für weitere Informationen gescannt haben. 

Ich war mit meiner Funkausrüstung beschäftigt und es tut mir leid, dass ich mir nicht genug Zeit nehmen konnte, um Ihnen zu erklären, was ich dort tat.


Ich bin ein Funkamateur, mein Rufzeichen ist ON7DQ, und höchstwahrscheinlich habe ich mit einem anderen Funkfreund irgendwo auf der Welt kommuniziert.

Vielleicht waren Sie einfach neugierig: "Was macht eine Angelrute auf einem Berggipfel?"

Die Angelrute, die Sie gesehen haben, ist Teil meines Antennensystems. Es hält einen dünnen Draht in der Luft, und mit dieser "Antenne" kann ich andere Funkamateure mit Morsecode oder einfach durch Sprechen in ein Mikrofon kontaktieren. 

Warum nicht einfach ein Telefon oder Skype oder WhatsApp verwenden?

Weil es Spaß macht! Und auch, weil es unabhängig von einem Telefonnetz oder dem Internet ist.
  Es läuft mit Batterien, so dass es sogar funktioniert, wenn es einen Stromausfall gibt.

Aufgrund dieser Batterien ist die Leistung meiner Funkstation begrenzt, etwas zwischen 5 und 10 Watt, nicht viel mehr als ein klassisches Fahrradlicht.
Trotz der geringen Leistung sind Kontakte in ganz Europa möglich, und mit etwas Glück auch mit anderen Kontinenten. Es hängt von der Tageszeit, der Aktivität der Sonne, dem sogenannten "Radiowetter" ab.

Ist der Empfang auf einem Berg so viel besser?

Die meiste Zeit ist es das. Nicht nur wegen der Höhe, sondern auch aufgrund der Tatsache, dass es weniger Störungen durch elektronische Geräte wie zu Hause gibt.

Aber das allein ist nicht der Grund, warum jemand seine Funkausrüstung einen Berg hinauf trägt. Es geht auch um die Freude am Wandern und am Freien. Hinzu kommt die Pflege von Freundschaften, denn viele "Bergfunker" kennen sich seit Jahren. 

Bergwandern + Funken = SOTA = Summits On The Air


Es ist eine Outdoor-Variante des Hobbys Amateurfunk.  Funkamateure tragen ihre Funkgeräte, Batterien und Antennen einen Berg hinauf und nehmen von dort aus Kontakt zu Freunden auf, die entweder auf einem anderen Gipfel oder bei ihrem Heimatfunksender auf ihre Bergkameraden warten.  

Spielregeln:

1) Die Pflege der Natur ist ein integraler Bestandteil von SOTA! Wir hinterlassen nie etwas auf einem Gipfel außer unseren Fußstapfen.

2) Das Funkgerät darf nicht an das Stromnetz oder einen Kraftstoffgenerator angeschlossen oder von einem Auto aus betrieben werden. Es muss eine echte "tragbare" Station sein.  

3) Die Station auf dem Gipfel und diejenigen, die Funkkontakt damit aufnehmen, erhalten dafür Punkte.  Das Erreichen von 1000 Punkten gilt als bedeutender Meilenstein und wird in der Community oft gefeiert.
Um die richtige Position des Gipfels zu finden, wird oft ein GPS wie beim Geocaching verwendet, wo man auch Punkte sammeln kann.

Wer hat dieses SOTA-Spiel erfunden? 

SOTA wurde im März 2002 von Funkamateuren in England und Wales ins Leben gerufen.
Mittlerweile gibt es weltweit mehr als 10.000 Funkamateure, die dieses Hobby teilen.  

Siehe http://www.sota.org.uk

Vielen Dank für Ihr Interesse!

Wat is SOTA ?

 Welkom!

Je bent waarschijnlijk op deze pagina beland omdat je me op een berg of in een natuurgebied zag en een QR-code scande voor meer informatie.


Ik was druk bezig met mijn radioapparatuur en vond het jammer dat ik niet genoeg tijd kon nemen om je uit te leggen wat ik daar aan het doen was.


Ik ben een radioamateur, mijn roepnaam is ON7DQ en hoogstwaarschijnlijk communiceerde ik met een andere radiovriend ergens in de wereld.

Misschien was je gewoon nieuwsgierig: "Wat doe je toch met die hengel als je niet aan het vissen bent ?"

De hengel die je zag is onderdeel van mijn antennesysteem. Hij houdt een dun draadje in de lucht, en met die "antenne" kan ik contact opnemen met andere radioamateurs, door gebruik van morsecode of gewoon door in een microfoon te spreken.


Waarom niet gewoon een telefoon gebruiken, of Messenger, of WhatsApp?

Omdat het leuk is ! En ook omdat het onafhankelijk is van elk telefoonnetwerk of internet. 
Het werkt op batterijen, dus het werkt zelfs als er een stroomstoring is.

Door die batterijen is het vermogen van mijn radio beperkt, iets tussen 5 en 10 Watt, niet veel meer dan een kleine LED-lamp. Ondanks het lage vermogen zijn contacten in heel Europa mogelijk, en met wat geluk zelfs met andere continenten. Het hangt af van het tijdstip van de dag, de activiteit van de zon, het zogenaamde "radioweer".

Is de ontvangst op een berg dan zoveel beter? 

Meestal wel. Niet alleen vanwege de hoogte, maar ook vanwege het feit dat er minder storing is van elektronische apparaten zoals thuis.

Maar dat is niet de enige reden waarom iemand zijn radioapparatuur een berg op draagt.
Het gaat ook over het plezier van wandelen en in de open lucht zijn.

Het is goed voor de fysieke en morele gezondheid.  
Daarnaast cultiveert het ook de vriendschappen, want veel 'bergradio’ beoefenaars kennen elkaar al jaren.

Bergwandelen + radio = SOTA = Summits On The Air


Het is een outdoor variant van de hobby van amateurradio. 

Radioamateurs dragen hun radio's, batterijen en antennes een berg op, en maken van daaruit contact met vrienden die op hen wachten, hetzij op een andere bergtop of bij hun radiostation thuis.

Spelregels:
1) Zorg voor de natuur is een integraal onderdeel van SOTA!
We laten nooit meer achter op een bergtop dan onze voetstappen.
2) De radio mag niet worden aangesloten op het lichtnet of een brandstofgenerator, of worden bediend vanuit een auto. Het moet een echt "draagbaar" station zijn.  
3) Het station op de top en degenen die er radiocontact mee maken, krijgen er punten voor. 
Het behalen van 1000 punten wordt beschouwd als een belangrijke mijlpaal en wordt beloond met een mooi certificaat.

Het vinden van de juiste positie van de top gaat vaak gepaard met het gebruik van een GPS zoals bij Geocaching, waar men ook punten kan verzamelen.

Wie heeft dit SOTA-spelletje uitgevonden? 

SOTA werd in maart 2002 gelanceerd door radioamateurs in Engeland en Wales.
Inmiddels zijn er wereldwijd meer dan 13.000 radioamateurs die deze hobby delen.  

Zie http://www.sota.org.uk  

°°°

En wat als er geen bergen in de buurt zijn …?
Dan is er nog altijd het programma “Parks On The Air” of POTA, zie https://parksontheair.com/

Natuurgebieden of "Parks" over de hele wereld hebben een nummer gekregen, en door vanuit die parken verbindingen te maken worden ook punten toegekend. Het leukste zij  de "park-to-park" contacten, waar je met iemand communiceert in een ander (verafgelegen) park.

°°°

Informatie over radioamateurisme in het algemeen vind je hier:
https://nl.wikipedia.org/wiki/Radioamateur


Bedankt voor je interesse!

Luc - ON7DQ