 |
| ON7DQ Clothespeg Paddle V2.0 |
In April 2017 I built my first "clothespeg" paddle. It was more of a joke, as a reaction to this thread on the SOTA Reflector.
https://reflector.sota.org.uk/t/homebrew-mini-cw-paddles-and-video/15044/
The idea for the use of wooden dowels came from Ignacio, EA3BD, and the idea for the clothespeg actually came from John, G4YTJ.
To my surprise, the paddle worked quite well, and I used it for some SOTA activations in EA6. Later on, I also used the paddle with all of my QCX rigs, during the different QCX QSO Parties.
But when working no one else than EA2BD who was doing a SOTA activation (and I was operating from the beach with my QCX Mini), I began to get erratic keying, and after investigating, it seemed that the self-adhesive copper foil I used was being pulled loose by the wires. Because I soldered the wires a bit too close to the center pillar, it began making contact even when I did not touch the paddle.
There was another flaw in my first paddle, the wooden dowels holding the pegs were mounted perfectly vertical, but that way the paddle would slowly work itself upward and become loose, so I had to make a "top cover".
So it was time for V2.0 !
The following pictures will give you a good idea of how to make one for yourself, it's not complicated at all.
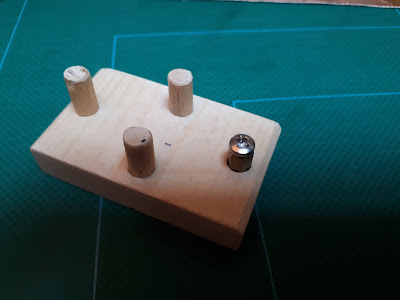 |
| Making the base |
I took a piece of wood approx. 57 by 34 mm, and 10 mm thick. See some dimensions in the drawing below. You may have to change some measurements, because well ... not all clothespegs were created equal, hi.

On the front to back centerline, drill two holes, the size of some wooden dowels. I used a 6 mm drill, which made the dowels press-fit.
You'll need three dowels of about 25 mm long. I used a chopstick to make the dowels.
In my first paddle, I used also a wooden dowel for the ground contact, clad with copper foil. But this time I use a hexagonal standoff (from the junkbox), which allso presses into a 6 mm hole, and used an eyelet and a screw.
The two "side dowels" are slightly tilted inward, by putting a small piece of cardboard under the opposite side when drilling the holes.
To measure where to drill the holes for the two side dowels, I put two pieces of cardboard, 1 mm thick between the paddles, so my contact spacing would be about 1 mm, which is fairly wide. You can adjust that spacing later, see below.
Two pieces of self-adhesive copper tape were put in the appropriate places. Again, this may differ from model to model.
If you have no such copper foil, you may glue two thin copper or tinned plates to the paddles, like the screening plates of a TV tuner, cut some metal from a Coke can, etc. Use your imagination.
 |
| Clothespeg becomes two paddles |
I also found a rather sloppy spring in my junkbox, probably from the battery compartment of a toy.
One end was bent over and pressed in a 0.8 mm hole in the left paddle. I drilled another 0.8 mm hole in the other paddle, just for the picture, to show the position of the hole.
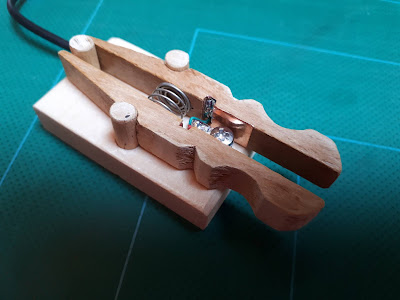
 |
| Cable and spring inserted, ready for assembly ! |
 |
 |
| Adjusting the contact spacing |
Here you see the paddle in action during it's first test this afternoon, during the QCX Challenge.

Big thumb for homebrew design!
ReplyDelete