20/12/2020

Some notes on the QCX Mini


Building the QRP Labs QCX Mini - 17m

This post is not about "unboxing" the QCX Mini, there is enough of that on YouTube. 

Also no details when they are clearly described in the manual. Only where I diverted from the manual, I will describe what I did. And I will add some of my tips & tricks that may be helpful in your construction adventure ... 

I used the manual version 1.05. If you read this (much) later, there may be a newer revision, so not all that is written here may still be valid, check the website.

Here a view of my workspace ... the kitchen table!

I have a row of strong LED lights above that table, and I can lower the whole thing very close to my workspace. Soldering iron is a Weller 25W with a fine tip, nothing fancy. 
Also on the table, but not in the picture: universal DVM, Chinese component tester, and nanoVNA.

All components sorted in trays (from a box of chocolates ... You never know what you gonna get! HI)


Of course I checked the contents of the package, and inspected the board with a loupe. The loupe I use  is very small, you can see the little round thing just left of my soldering iron. It was the lens from a laser printer. I have to keep it very close to the board but it gives a very good image, just like using a microscope. 

The kit seemed complete, and the board looked OK, all good so far.

WARNING ... SMD COMPONENTS

Several people reported broken SMD components.
Maybe I was lucky, but my board was perfectly soldered and showed no broken SMD's.

BUT ... while mounting the through hole components, I caught myself almost destroying one of those tiny SMD's. Holding my side cutter flat to the board to cut off a wire from a capacitor, I noticed that I almost had pinched an SMD between the back of the side cutter. Had I pressed firmly I would have broken it.

I'm not accusing anyone that they did break the SMD's, but be warned to work very carefully ...

Seperating the boards

I couldn't wait to see how the three boards really fit together .. so first I jumped to section 3.30 Break apart inner PCBs of display board.  I filed the sides until all looked perfect, and then went back to the beginning ... 

Winding T1

Like in my previous two QCX's (e.g. see my 20m QCX here) , I haven't wound T1 as described in the manual.
I wind T1 with all four windings seperate, but cutting the legs at slightly different lengths. 


That makes it easy to insert the legs one by one into the correct holes, then pulling them tight and slightly bending them to keep T1 in place.


I cut the wires really short,  then heating them long enough until the enamel burns off, and the wire can then be tinned an soldered in one go.


Checking continuity with the DVM, all was good. Then I continued with the other components, up to and including section 3.8 (C27/C28).


The LPF : measure it first !

At this stage, I jumped to section 3.25 Wind and install toroid L2
Also  wound and installed L1, L3 and the BNC connector (section 3.28) at this time.

The coils were wound with the windings spread out 180° on the core, so I could still extend or compress them. I used the nanoVNA to measure the inductance and found all three coils giving way too much inductance.

Interlude 1: how to measure components with the nanoVNA.

I built this component adapter, with matching SOL calibration kit. Sounds expensive, but is really very cheap!


A 4-pin female header is soldered to a female SMA chassis connector, two pins to the center, two pins to the ground. That way I can measure different sizes of components, inserting them in the header, or touching two of the four contact prongs. Using the two prongs I bent upward, I can also measure SMD components.

The CAL kit is just a SHORT, and a 49.9 Ohm SMD resistor (2 x 100 Ohm in parallel would also work), soldered to a male 4-pin header. The OPEN is just ... leaving the middle pins open.
Calibration is super quick, since (un)plugging the header is much quicker than mounting an SMA connector, and it works really good, even up to VHF. 

The nano VNA is put in CW mode on 50 kHz (or a higher frequency if you want to measure your component at the working frequency). Measuring S11 at port CH0 gives capacitance or inductance right on your display, and is quite accurate (I checked with some precision components).

If you want to know what else you can do with a nanoVNA, study the slides from my nanoVNA Presentation here.


When I removed ONE winding from L1 and L3, and TWO windings from L2, the inductance was very close to the values from the table in the manual. Of course, check your coils according to the band you're building it for.

Now, how to measure the LPF ?
On one side we have the BNC, so using a BNC-SMA adapter, that was easy.

For the other end, I mounted an SMA connector with two short wires to C29 and ground.
I used the ground pad of C30, but of course this filled the hole for C30 with some solder.
No problem, later on, holding C30 in place with one finger, I heated the pad and could push C30 into place, flush with the board. Re-soldered to be sure, and soldered the other pad of C30.

When I first measured the LPF, with the coils as I wound them, the cut-off frequency was around 20 MHz.

With just a little tuning of the coils, I came to this curve (not sure why the curve is a bit crooked ... but did not spend much time on it, I wanted this Mini to be finished , hi):


At 18.1 MHz I had a loss of  0.75 dB, and at 36 MHz, suppresion was 50 dB, so that looked OK for me !

Now, Hans has mentioned before that the output impedance of the Class-E amplifier is not necessarily 50 Ohm. So is it useful to tune this filter for best response between a 50 Ohm source and load ?
I think it is !

As we will see later, my output power without any further tuning was already 4.5 Watt (at 12V DC in), and I think that is not bad for a 17m model. But I may do some more tuning later.

For now, satisfied with my filter , I jumped back to section 3.9, and continued as described.


Class-E inductor L4

I wound L4 as instructed in the manual, and checked the inductance with the nanoVNA (see above).

It was a bit more than the value in the table, but I left it as it was, because I wanted to try if I could use my QCX-17m also on 20m, so it would be better if the tuning of L4 was rather on the low side.
As we will see later, it does work on  20m!

I did the same with my QCX-40m and QCX-20m, using them on the 1-lower band (so 60m and 30m), both resulting in some QSO's.

Battery indicator

The battery indicator is disabled by default, and how to use it is only described in the Firmware manual. So if you decide to switch on the battery indicator in menu 7.2, you will find out that it doesn't work ...?

Oh yes, you should connect the DVM input on the QCX Mini to the +12V pin at the four pin male header "DVM/Power Meter".

Well, the header is not described in the assembly section of the manual (but it is described in section 4.20 Test Equipment), and it is not included in the kit, you have to put one yourself. I didn't put the header, because I don't intend to use the built in Power Meter function, so I just bent a wire in a loop to connect DVM to +12V.


Just think about it BEFORE you put everything in that little case ...


Protection for the LCD module

When following the final assembly in the (optional) enclosure, the manual says to remove the plastic protection film from the LCD. So I did, but I didn't want to put the LCD unprotected in its housing.
So, what I did ... I cut out  a piece of transparency film (you know, from the time we didn't use a beamer, but a "slide projector"), slightly larger than the LCD frame.
With four small drops of superglue, I fixed the film on the LCD frame. It is hard to see in the picture but it's there!


The famous "C38" mod ... and a FUSE!

I was lucky to receive my package late enough to hear about the 5V regulator trouble.
So of course I did the C38 mod, but I wanted to do something more .. put a FUSE in line, for any other accident that was waiting to happen.

Interlude 2: Hans thinks I have a Fuse Fetish, but if you were as stupid as me to connect an expensive IC706MkIIG in reverse on a 12V/7Ah gel cell, WITHOUT ANY FUSE in line, you learn it the hard way ....
NOTE: in case you're worried, the 706 did survive, it has two 60A polarity protection diodes, so the 120A current melted my rather thin DC cable, and then the diodes killed themselves, but by then I had pulled the plug, and burned my fingers on the hot wire ... another lesson learned, hi.
I could replace the diodes and the rig was OK, I still use it today ... but NEVER EVER again will I connect anything without a fuse!

OK, so this is what I did. I found a small 1A polyfuse in my junk box, and first mounted the fuse as in the picture:


Then came the "idiot" diode D33, with the cathode lead bent over towards the fuse, and soldered to it. Then soldered the other pin of the diode.


Finally came the capacitor, I found a small 22µF/16V tantalum which fit the available space, without touching the volume potentiometer.


Here a view from the side, with the Controls board also mounted.


Of course one can always put an external fuse in the DC cable, and maybe make a dedicated cable for the QCX Mini. And while you're at it, put an ON/OFF switch in line as well, it saves plugging/unplugging the DC jack all the time when testing.

I thought to add a 5.1V/1W (or a 5.6V) zener at the output of the 5V regulator, so it would blow the fuse if the output goes any higher than 5V, but Hans assured us that is not needed, so I skipped the zener, and I hope Hans is right ... hi. 

Anyway, careful as I am, I powered the QCX Mini main board without the microcontroller first, if anything bad happened, I would at least have a good CPU.

After checking that the 5V was OK, I unplugged the power, and then mounted the CPU, and continued with the other boards.

Then I completed the assembly of the three boards, but before putting it in the enclosure, I did the adjustments ...
The BPF went as expected, no problem.

Adjustment of the trimmers

Several people reported that the adjustment of the IQ-Balance with R27 didn't do what was expected.

At first I had the same experience, but after turning the other two trimmers halfway, everything adjusted as described.

Since I think the trimmers are delivered all turned CCW, a suggestion is to first turn R14 and R24 some 5 turns CW, and then start tuning R27.

Make an extension cable

I saw a good idea on the SOTA Reflector, by Marcel, DM3FAM. See a picture of it here.
So I also made this extension cable, to be able to work on the QCX Mini, and still have access to the LCD display. Thanks for the idea Marcel!

NOTE: make sure you plug it in the right way! ;-)


Don't plug your KEY into the PTT jack ...

Very sorry to read that one OM did this, so I feared of doing the same when in a hurry ...
I looked for some rubber plugs, but didn't find any, so I came up with this simple and cheap solution.

I took a tiewrap, slightly wider than the jacks, cut a length of about 3.5 cm.

Then narrowed the ends with a sidecutter, bent it into a U-shape, and pushed it in both the PTT and CAT jacks. It sits firmly, and does no harm to the connections. 

It looks like a nice belt clip, but I wouldn't trust to hang my new toy on my belt like that ;-)


I don't like Hans' buttons ...

Just a personal preference, but I never liked the buttons that were shipped with the QCX kits, so this was no exception. I went through my button collection and found two small push-on buttons, no screws to fix. And tuning the rotary encoder is also quicker with the smaller diameter, I like my buttons! (HI)


Results and Measurements


RBN 

I received my package on Thursday dec 17th, started the construction on Friday, and by Sunday noon, it was all assembled, adjusted and built into the enclosure, ready for some real tests.

First I programmed some message memories.
A regular CQ message in memory 1, a special QRP CQ message in memory 2, and two lines for the custom splash screen (see top picture), in memories 11 and 12.
Then I let the rig auto-CQ for a while, resulting in … NIL replies, quite disappointing to say the least.
BUT … RBN showed that I was at least putting out some signal.
 

Some days later, I did another attempt, now calling as ON7DQ/QRP, that should attract some more attention you would think, but no … NIL replies. 

Of course, 17m is not the easiest band, it’s not open day and night like 40m (and even 40m can sound dead at times). But RBN gave me good hope, I even made it into the USA !
Not bad for 4.5 Watt and a simple random wire antenna (33m long).
 

(Note: the greyline is not correct, the screenshot was taken at another time)


QSO’s

RBN is one thing, but could I make some real QSO’s ?
Sure, but it takes some patience and good luck.
Tuning around, I noticed that the receiver was excellent, I heard a station from China (BA5AD), and on an other day I heard one from Thailand (E29TGW).

First 17m

First ? you may ask, isn’t the QCX Mini a monoband radio? Well, let’s wait and see …

My log on 17m so far:

Date       UTC      Call      RST received
Dec 21     0803     RW3PZ     559
Dec 21     0943     UT2LA/QRP 559 (OM Serge was using 5W and I gave him a 529)
Dec 21     1304     TA1PB     599 (YES that’s Turkey … but not Hans Summers hi)
Dec 23     1102     SX9A      599

And now … 20m !

I had used my other QCX rigs on the “one-lower” band before. So using the 20m model on 30m, and the 40m model on 60m, both resulting in several nice QSO’s. 
I hadn’t changed anything to the rigs, not T1, not L4, not the LPF.
The output power drops some 20%, and the RX sensitivity will of course be lower, but my experience was each time that it was good enough to be useable, and harmonic suppression was more than adequate.

Would this 17m QCX Mini also perform well on 20m? Let’s try that out.

TIP: to make a band change easy, I programmed 14.062, the most used SOTA frequency, as the default frequency for VFO B (see Menu 3.3). One press on the right button changes to VFO B, but two presses are needed to return to VFO A, or you will be operating SPLIT.
If you think you will use SPLIT a lot, it may be better to program a frequency for the other band in one of the Presets (see Menu 1).
 
I connected another antenna , a 20m monoband groundplane, which does perform a little better than my random endfed.
I tuned a bit closer to the QRP calling frequency 14060.50, and started CQ’ing … and to my surprise, after only three CQ’s , I got called by no less than YT2T/QRP !
We had a nice 2-way QRP QSO, OM Marko was using 5W and I gave him a 559, and got myself a 569, with only 3.5W output, amazing !  

Conclusion : in an emergency, you get a second band for free with the QCX rigs. Great fun !

Just one thought: since the L4/C30 network is not tuned for 20m, efficiency is probably lower, and some more power could be dissipated in the BS170’s … so use at your own risk.
Note to self: I should do some temperature measurements when I find the time …
[EDIT: no risk for the finals, see measurements here]

First DX!

On Christmas Eve, I did a few CQ’s on 17m , calling for SKCC contacts, using my One Piece Plastic Cootie key (see a short video of that key here).

To my surprise, I quickly got a reply from no less than W3NP, Dave in Fort Ashby, WV .

He had a very good signal of 579 with some QSB.
We had a nice QSO, and I got a 349 from Dave, also with QSB, but he got all my info OK.
So this was my first DX QSO with the QCX Mini.
I called some more on 17m, but got no more replies, so I decided to try my luck on 20m.

After a few CQ’s, I got called again by W3NP !

This time I got a 449 report, with only 3.5 Watt and a groundplane antenna, amazing!

Distance for this contact was 3833 miles, resulting in a 1095 miles per Watt contact, so this was also my first time I crossed the 1000 miles/Watt limit and this entitled me to the SKCC's QRP MPW Award.


Tuning the toroids

After I made an extension cable for the LCD (see above), I could fiddle a bit with the windings on the toroids, and still see on which band I was. I powered the QCX Mini with exactly 12V at the DC connector (and I have the idiot diode installed).
.
I only changed L4 and L3, and after a few tries, I could crank up the power to 5.6W on 17m, and 4W on 20m. This is my final result.


Measurements

Since this post is already quite long, I moved the measurements into a new post here

And check out my post on making the QCX Mini into a dual-bander here

73,
Luc ON7DQ

18/11/2020

More examples of the OST Morse Box

See the original description of the OST Morse Box here.

And the nice cabinet made by my co-author Gilbert, ONL12523,  here.

A few more people sent me pictures of their version.

This one was built by Wil, ON6EO.

The frame is made from pieces of PCB, the cover was bent from a piece of sheet metal (the cover from a PC, which was already painted). 

The other outer surfaces were spray painted. Doesn't it look professional ?


Completed Morse Box


Insinde view from the front


Inside view from the back


This is a "quick and dirty" build by our Morse Teacher Aimé, ON4AIM
Only the three knobs on the potentiometers are still missing, but the Morse Box is operational.


Four more Morse Boxes were built by Jos, ON6WJ and his friends. Jos sent me this picture, with two of those already boxed and "personalized" by Luc, ON4AAQ, nice work !


Have YOU built the OST Morse Box?

Please send us some pictures, and we can add them to our gallery!

To be continued ...

73,

Luc, ON7DQ
(e-mail address is on QRZ.com)

06/10/2020

Testing the ATU-100


After weeks of rain, today we had a nice sunny day, so time to get out to a local park and set up my KX3, with the internal ATU disabled, and test the ATU-100 (See my report on building it here).

I set up my favourite SOTA antenna, a 9.15m endfed with 4m CP, and a 9:1 UNUN, coax 3.5m RG-58. The antenna was sloping from abt. 5m to 1m above ground as you can see in the picture.


The KX3 tunes this antenna without any problems from 80m to 6m, SWR = 1 everywhere, but of course, the efficiency will vary considerably.  

I tried to tune the antenna with the ATU-100 on all bands from 80m to 6m.
I double checked the SWR with a Hansen SWR3S SWR/PWR meter, since the SWR meter in the KX3 is rather coarse to get a good reading.


At first, the ATU wouldn't work in AUTO mode, so I set it to MANUAL, and then got it tuning by pressing the red TUNE button each time I changed bands.
Here the results.


The small differences in measured SWR are acceptable I think.
SWR is measured on a different spot along the transmission line, and there may be a slight loss in the connecting cable.

Next, I put the tuner back in AUTO mode, and did a few band changes ... and believe it or not, it worked like a charm !

I went back to 40m ==> 1.21 , then to 20m ==> 1.05, then 15m ==> 1.17, then 10m ==> 1.16, and back to 40m ==> again 1.21, all within a few seconds of transmitting, and without touching any button.

During the whole afternoon, the average current consumption was 30 to 40 mA. And I could not hear the strange noises as reported on the SOTA Reflector by Ed, DD5LP.


[Note: the laptop case contains my 4-band 50W amplifier (the so called Chinese DIY Kits 70W Amp), LiPo battery,  another ATU  (an LDG Z100) and the Hansen SWR meter]

Ok, time for another test, QRP !

I intended to use this tuner for my QCX rigs (40m and 20m models), but for this test I just put the KX3 at 5W.

But now comes the disappointment: the ATU-100 as built does not tune with only 5W.

I have to study the manual and some websites, I may have to put a few more windings on the Tandem Match to increase its sensitivty.

So nothing else to do than tune up with 15W, and then reduce the power to 5W QRP.

The sun was still shining, so I tried to make a few QSO's. Unfortunately, no SOTA stations in Europe were spotted. Here the log of what I worked, and powers used.


* The bad report I got from EI7JN was because I had put the ATU in AUTO mode again, and halfway each transmission it started retuning, but then stopped at a bad SWR, and as a result the KX3 folded back to only 5W. Even when tuning manually then, it was difficult to get a good tuning, since the KX3 refused to put out more than 5W. 

By 17:30 local time, I was getting cold and it was time to go home ...


CONCLUSION

From these short tests, I could conclude the following:

Does it work ?
Yes, sometimes, if you're lucky, and if you have more than 10W, so as it is, it's not suited useful for QRP.

Is it reliable ?
Hmmm, I would have to do some more testing. I don't think I would trust it as my only option.
For SOTA, I will rely on the tuner in the KX3 for sure. And for the QCX rigs, i will probably stick to the tuned antenna's I was using before (link dipole, half wave endfed or ground plane vertical).

So all in all, a nice little tuner, and it can fulfill some purposes ... but don't expect more from it than what you paid for ...
If I find better results after more testing, I'll let you all know.

73,

Luc ON7DQ


23/09/2020

Building an ATU-100 (N7DDC)


EDIT (November 2025) : I built a second ATU-100 in a different case, and also wrote a report about it. You can find here.


I won't make a full report of my build , since all information on this autotuner is available online.
This is the github page where you can find it all.
Some nice descriptions can be found by Googling ATU-100.

And visit these pages by R0AEK with some very helpful information (in Russian, but Google does a decent translation). There are 4 parts.

So here just some pictures of what I did, from the package arriving from China (in 11 day's, that was quick !), to the final result.

The parts arrived in a nice plastic box, and then in some plastic bags.

The SMD's all pre-soldered.


The SWR bridge


All coils ready, with some other components.


Adding the 15 relay's.


Winding the tandem match was the hardest part. TIP : I removed a few strands from the RG58 center conductor to make it fit the holes in the PCB.


All parts of the case ready to assemble.


Detail of the front panel


Back panel


Back panel inside.


Boxed it !


Making the connections to the board is not complicated, see markings on the main PCB.


GND and + is for the 12V DC power supply or battery. 
GND and B is for the big TUNE button
On the 5 pin connector, only 4 pins are used to connect the OLED display:
VCC  goes to VCC on the display
GND              GND
DAT               SDA
CLK               SCL

Finally there are two optional buttons, they connect to two pads on the underside of the PCB, the other side of the buttons goes to GND of course.
B1 is the AUTO button (it shows as a DOT on the display).
B2 is the BYPASS button (it shows as an UNDERSCORE on the display).
 
This pictures show clearly where those pads are, but be careful with static when soldering, the pads are directly connected to two CPU pins. It is advised to put a 100 nF capacitor over each of those buttons, to avoid RF getting directly into the CPU. 


Almost finished


The last step was making a nice cover. I used the top cover from an old Macbook Pro laptop, and was able to save the "Apple" ... hi.

Adding a high brightness LED, using only an extra 5 mA to light the Apple logo, this is the result !


I only did a short test on my home antenna, and all seemed to work ok. 

More extensive testing to follow during my SOTA or other /P activities ...

UPDATE : to be used with a QRP trransceiver, I did not change the winding on the SWR bridge, but only changed cell 05 in the EEPROM to a value of 01 (minimum tuning power 1 Watt).
I found this info in a video by MW0SAW, watch it here.
Note: the video is a bit confusing, since it treats the ATU-100 (EXT), ATU-100 Pro and the ATU-QRP 40 (all in the same video !).
These are my actual EEPROM values:


73,
Luc - ON7DQ

22/08/2020

Building the DIY Kits 70W Linear Amplifier


Introduction

 Like many other hams, I couldn't resist ordering a Chinese kit for a 70W amplifier for under 20$!
This kit comes without any documentation, but luckily some good people have done all the work for us.

First there is this excellent description by PD7MAA that you MUST read. And in this page you will find the link to a very extensive description by OE1CGS , including a simple mod to substantially improve the input SWR. Most of that text is in German, but there is an abbreviated English text here.
Finally, DK9JC did some tests on this amp, and his report has many pictures.

I won't go into the circuit diagram and other details, you'll find it all on the sites above. Here just some pictures and a description of how my version turned out.

I wanted to use it first of all with my two QCX rigs, for the QRP-Labs QCX QRO Challenge
So I built two LPF, one for 40m and one for 20m, with the values found on the PD7MAA site (and are also used in the excellent 50W PA by QRP Labs).

Knowing that I have used my QCX rigs on "one band down" without much degradation, those filters are also good for 60m and 30m. So I would end up with a 4 band amplifier.

And yes, I know that we can only put out 15W ERP on 60m, but that may be what you get if you put 50W in a compromise antenna ... right ? ;-)
Anyway, I did work EA8 with an unmodified 40m QCX on 60M one day, and have made several QSO's on 30m with my 20m set. All with a slightly reduced power of 4 Watts, so who needs an amplifier?

First test

First, I wanted to do some tests, and I built a kind of breadboard setup, which you can see below. 
After some measurements, I concluded that 2W drive power was about the right level.
Problem: I can reduce the power in my KX3 to 2W, but not so easily in the two QCX rigs which give 5W ... that's 4 dB too much power. On a bench supply, you can reduce the supply voltage, but when operating from batteries it may not be that easy.
So for those rigs, I added the option to insert a 4dB attenuator. 
I didn't want to make it too complicated, so the 4dB attenuator stays in line for RX, while it should only serve in TX mode ... I know! Maybe I will change that in the future or in a next (re)-build.


In the picture, left to right:
The two low-pass filters, the amplifier module with heatsink and fan (the CPU cooler from an old PC), a PTT switch to manually put the amp in TX mode, and the 4dB attenuator for QCX use.
All my tests were done at Vcc = 12V. I know you can get way more power at higher voltages, but I want to use this amp on batteries, so 12V it had to be. 

All worked well and I got over 60W on 40m , and around 50W on 20m.
After those tests, I did the mod by OE1CGS (see link above), by adding a 22Ω/2W resistor over the secundary of the input transformer T1 (see picture).

This brings the input SWR down from 5 to just 1.1. Quite an improvement, but the drawabck is that you loose a bit of output power. Now I would get 45W and 36W out. Still good enough for me ...

Now you may have noticed that I also have a KX3, which gives 15W from 80m to 20m, so why an amplifier whivh only gives a maximum gain of at most 5 dB ?

The problem with those 15W is that the KX3 needs a higher supply voltage for that, and when operating in a hot climate like in EA7, it will quickly heat up and then will switch back to 10W or even 5W. Adding a black heatsink will not help much in a hot climate. Adding a fan does help, but that is then another item to carry ...

Running my KX3 at only 2W will avoid the heating problems, and I may even run it on its' internal batteries for quite a while.

Putting it in a box

I tried to make it as small and light as I could, and ended up with a plastic modem case. Total weight is only 560 g (excluding batteries , hi).


I cut the breadboard  in tghree, saving the LPF board and attenuator board.

The amplifier module was mounted upside down on some spacers, so that the heatsink protrudes on the top.
I added a connector for PTT control, compatible with the KX3 control cable, and removed the switch.
I still have to modify the QCX rigs for PTT control, but that needs only one resistor and an extra 3.5 mm connector.

This is the back panel.


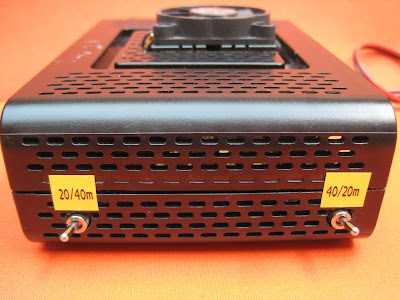
This is the side with the two switches for the LPF selection. Of course both switches must be on the correct position. I didn't want to put input and output on the same switch to avoid unwanted copupling, and maybe causiong oscillation.


And this was the end result


And here a view of the amplifier in use on a SOTA activation (2/9/2020 on ON/ON-027).
KX3 > Amplifier > Z-100 Autotuner. The setup was powered from a 12V/17Ah gel cell.

The Z-100 is to be replaced by the smaller ATU-100, another Chinese kit, which I described here:
Building the ATU-100


Measurements

I was also curious if the harmonics were within spec, so I used a Siglent spectrum analyser and 45 dB of attenuators in line, and at 2W input to the amplifier, I got the following results (click on the graphs to view details):

40m, mode CW, 7.033 MHz, Pout = 45W


Not a harmonic in sight, but if there are any, how big are they ?
This analyzer has a "harmonics test" mode, which instantly shows the level of all harmonics, related to the carrier power. All harmonics are more than 56 dB below carrier, so it looks very good.


The same for 20m, mode CW , TX 14.062 MHz, Pout = 36W


Here, the 3rd and 5th harmonic are just visible. The analysis shows that  they are still more than 45.6 dB below carrier, so still acceptable.

Is this "linear" really linear?

I did not make any real measurements (yet), but just tried the amplifier on the air in SSB mode during my SOTA activation. I asked several people who gave me a 59 report, if they heard anything special, any distortion or such ... and none of them could hear anything bad ... so far, so good.

I suppose it doesn't behave like an expensive "professional" amplifier, but we"re only "amateurs" after all ... 

If I ever get to make real measurements of the linearity, I'll update my post.

And now for real ...

After I boxed the amplifier, I did some brief test transmissions (3x CQ RBN on each band), and checked RBN for the results. See for yourself ... not bad eh ?


Conclusion

I'm quite satisfied with the result of this cheap amplifier. Total cost, with the LPF ringcores I had to buy, the rest being "free" stuff from my junk box, was under 20$.
I can use it on 4 bands, with both my KX3 and my two QCX rigs, delivering some 40-ish watts of power. Nice !

If you found anything useful in this report, let me know !

73,
Luc - ON7DQ