30/10/2024

Chinese Manual Tuner


I have seen this cheap little tuner pop up in newsgroups, and on numerous websites, so finally decided to "see for myself" what this tuner is worth. I ordered a kit for just 12€, shipping included. If all went wrong, I would at least have a nice plastic box and some components to use in another project.
This is what I got before assembly.


There is an updated manual on the internet here. But I got most help from a video by Carol KP4MD, that you better watch before starting.

The important points are the orientation and grounding of the main coil of the T-match network, the correct mounting of the SWR transfomer T1, and how to fix the buttons to the polyvaricons without them coming loose.

Another point is that you better remove the plastic stubs inside the box, where you want to mount the polyvaricons. I did that with a Dremel tool with a grinding wheel.

Here is my final circuit diagram:


As you wil notice, I wound my coil with a slightly different scheme, here are my data:

switch     total       measured total
position   turns       inductance (µH)  
A          37          18.0 µH
B          27          8.6
C          24          7.4
D          21          6.1
E          18          5.0
F          15          4.0
G          12          3.0
H           9          2.1
I           6          1.35
J           4          0.90
K           2          0.56
L           1          0.49
(or if you like, the turns between the switch tabs are 10 - 3 - 3 - 3 - 3 - 3 -2 - 2 - 2 - 2 -1)

NOTE : 'L   1'  above means that there is still one coil winding from the last switch tab to the connection between the polyvaricons. Also, the inductance was measured with 3cm leads at both ends of the assembly, before mounting. The wires were cut shorter when mounted in the box, so the total inductance will be somewhat less, especially the low inductance values. I did not re-measure them.

I replaced the rotary switch from the kit by one from my stash, that I trusted somewhat more.
Therefore I also had to find another button.
And after carefully drilling all the holes, winding the main coil, and mounting all the other stuff, this is the finished tuner. I put some labels over the Chinese text, see top picture for the end result.  


And now the question : does it work?

I took the tuner for a POTA activation, and I can testify that, if built correctly, it does work!

I was able to tune my random endfed (length 9.15m with 9:1 UNUN + 4m CP + coax 5m of RG-58) on all bands from 60m to 10m.
80m and 6m didn't tune very well.

I made 18 QSO's by calling CQ myself, on 20m and 40m, SSB and CW.
But then I wanted to hunt for some park-to-park QSO's, and it became obvious that a manual tuner slows you down, having to retune after each band change.
So I switched back to my ATU-100 automatic tuner, which is in the picture below.
I forgot to take a picture of the Chinese tuner in action, but you can see it in the background, hi.


73,
Luc ON7DQ


28/09/2024

LoRa APRS Tracker


When you look at the SOTA reflector, it seems like every SOTA activator has built this LoRa APRS Tracker. There are now already 10 threads of 100 messages each about this project. Good luck if you want to read all those messages, the first thread starts here :

I think thread number 9 had just started when I decided to give it a go. I do have a Yaesu FT1D which can transmit my position, but it seems nice to have a dedicated APRS tracker, and save the handheld battery for other purposes, like making QSO's !

So I ordered a HELTEC WIRELESS TRACKER board on Ali Express (price was 23.59€, shipping included). It arrived in 11 days, and I flashed the board witht he code I found on the GitHub page of Ricardo, CA2RXU:
https://github.com/richonguzman/LoRa_APRS_Tracker
The Wiki contains much more information, be sue to check it out:

I also used the detailed instructions on how to get the firmware into the tracker from this website:
 https://hamradio.my/2024/09/how-to-turn-a-433-mhz-heltec-wireless-tracker-into-a-433-mhz-lora-aprs-tracker/

The only thing that was not directly clear to me, was that you have to upload the configuration file (tracker_config.json) separately from the firmware, this is described as "upload firmware" then "upload filesystem" in the Wiki.

UPDATE : in the mean time, Ricardo made a "Web Flasher tool", to save you from installing Visual Studio Code. I have not tried it yet, but it should make things much easier.

When I got it all right, it worked first time ! 


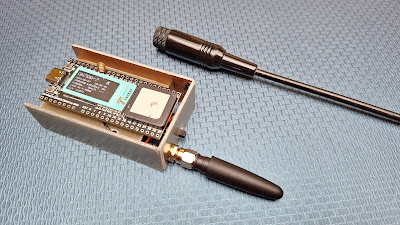
Then it was time to find a box to put the tracker in. I don’t have a 3D printer, so I had to make a box myself. I found a small plastic pill box, and made an inner “chassis” from pieces of PCB to hold it all toghether. The metal of the chassis would also make a kind of groundplane for the antenna.
The battery is an 1800 mAh Li-Ion cell from a laptop battery. Next to the antenna connector is the POWER switch.

This is the frame with the tracker board and battery mounted, but before I added the two pushbuttons:


The board came with a very small antenna, which is probably not much use, so I replaced that with an antenna from a handheld rig (see top picture), or the even longer quarter wave antenna shown in the picture above.


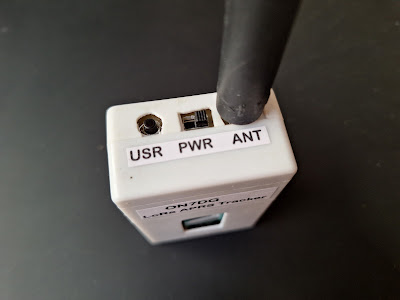
After this all worked, I needed to add two pushbuttons, since the internal pushbuttons would not be accessible once it was in a box. I added a USR button on the top, and a recessed RESET button on the side.

After making all the holes in the plastic box, I could put the frame inside. Add some labels and the tracker was ready for use.


Summary of operating instructions on the back.


I made several "test tours" around my home town, and all seems to work OK. I am lucky that there is good APRS iGAte in the vicinity. I wonder how good it will work on a SOTA summit ?


GL es 73,
Luc ON7DQ
 

21/09/2024

Digispark CW Keyer

 A small and simple CW keyer with Digispark (*** or an empty ATTiny chip)

I am a big fan of Arduino programming, but I had once ordered 5 very small CPU boards, called Digispark. They contain an 8-pin CPU of the ATTiny85 type, and cost around 3€ on Ali Express, etc. If you’re interested in more info, read this : 
https://diyusthad.com/2021/07/digispark-attiny85.html#what-is-digispark  

I never did much with these boards, other than make a small “Knight Rider” running light as a demo. 

By coincidence, a few weeks ago I found some YouTube videos by LabCat, who appears to be Tobias DL3MHT. He built a small CW keyer with a Digispark. Here is a short video showing the keyer in action : https://www.youtube.com/shorts/frkpCNYbVr8 

And a much longer video showing the complete build of the circuit : 
https://www.youtube.com/watch?v=mSMUsS8t9xk 

The code is an adaptation of the YACK (Yet Another CW Keyer) by DK3LJ (with modifications from AI4SV and WD9DMP). The final DigiSpark version can be found here : https://github.com/labcat73/ATTiny85_CW_Keyer

The only things I changed are a few of the confirmation characters, they are found in lines 67-70 of the main sketch:

const char txok[] PROGMEM = "R";
const char vers[] PROGMEM = "V0.88";
const char prgx[] PROGMEM = "C";
const char imok[] PROGMEM = "K";

Programming a Digispark board is a bit tricky, since there is no real USB interface. The bootloader emulates a USB port in the first 5 seconds after power-on, so the upload of the code must begin in those first 5 seconds. Therefore, the Digispark may only be plugged into the PC after the Arduino IDE gives a message to do so. Carefully read the instructions in the README on the github page above.

I first built a prototype "in free space" to check that the circuit worked, and it did !
Here it can be seen with a "PA0CMU" type paddle, made from pieces of PCB (a web page about this paddle is here).


Then I built it on a piece of perfboard, since this will be a one-time project. Here the simple circuit : 

(source: DL3MHT)

The only change that was made was to reduce R2 from 4k7 to 2k2, to make the keying reliable on a lower supply voltage. I power my keyer from just 1 Li-Ion cell (4.2V when fully charged).

And here is what I made of it:
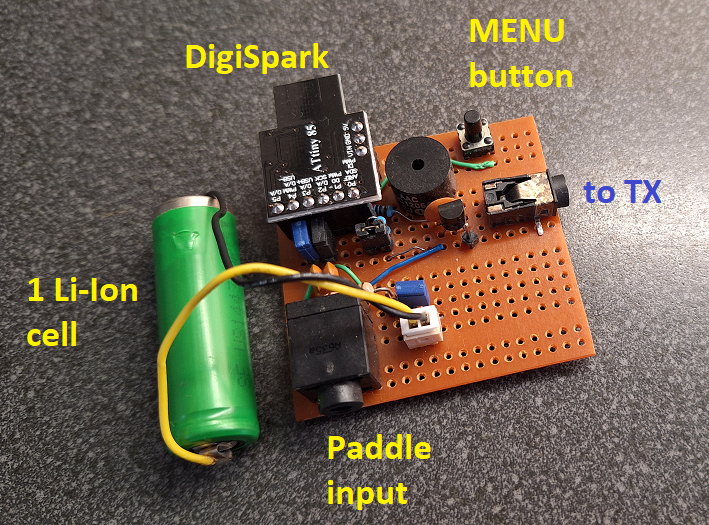
The Digispark can be removed from the board for reprogramming if needed.

Tobias made some changes in the menu system of the keyer, and I changed some characters.

So I edited the standard YACK manual to reflect these changes, see below. Copy it to a text editor and print it out for reference. Check out the many settings and possibilities of this little keyer, I'm sure you will be impressed.

Still TODO : find a suitable box to put the circuit in, I will update this post when I get there ... hi.

And now the big question : does it work ? It sure does, I used the keyer in one of the last QCX QSO Parties. I put my QCX in straight key mode, and used this keyer and a leg mounted American Morse Equipment "Porta Paddle" to make 7 QSO's. The only errors that were sent were my fault ...

*** EDIT: Same code in an empty ATTiny chip.

I got a report from Vin, PE2V, that he tried this code in a Digispark, but at startup he got a strange fenomenon. The Digispark would send 10 series of four quick dots, so if a transceiver was connected he would send 10 letters H, which is not what he wants.
The culprit seems to be the bootloader in the Chinese Digispark Rev3 that he used.
My Digisparks are older, they don't have the 'Rev3' marking, and don't show this behaviour.

I did have some empty ATTiny85 chips, and tried to put the code in one of those.
I used the method found here.
It worked but the keyer was super fast ... it sent at somethoing like160 WPM instead of 20 WPM ??
This had to do with the clock speed. I did set the clock at "1 MHz (internal)", but that was not enough.

A FUSE in the chip must be changed to set a prescaler on the clock. Luckily, this is very simple, just set the clock at 1 MHz in the Arduino IDE and then execute the command 'Tools>Burn Bootloader'.
This does not really burn a bootloader, it only sets the correct fuses. Problem solved.

I built the circuit on the breadboard I used for programming, and all seems to work now. See this short video on YouTube : ATTiny keyer

Rather than built another keyer, I replaced the Digispark with a "Belgian Clone", Rev-ON7DQ.
I mounted the chip on a small piece of perfboard and wired the pins of the chip to the corresponding pins of a Digispark. It works !

Here the wiring on the underside.


And my "clone" mounted on the keyer board, replacing the Digispark.


73,

Luc ON7DQ

***************

(Manual adapted from original YACK manual, and additional notes by DL3MHT)

YACK - Yet Another CW Keyer - User Manual
Version: 0.88 by Tobias Selig DL3MHT

Hardware :
As is, the library is configured to run on a stock ATTINY45 cpu with its internal oscillator at 8MHz, prescaled to 1MHz. The ATTINY45 comes with 4KB of Flash memory and 256 Byte each for RAM and EEPROM. It can be ported to other AVR chips if these have sufficient features to support the intended application. As the library was written in C, processors without internal stack will not work with this application unless significantly rewritten.

Hardware connections are defined in yack.h

Pin 1 : PB5 - RESET (Can be used for additional button)
Pin 2 : PB3 - DIT (towards GND, buffer with 10nF cap)
Pin 3 : PB4 - DAH (towards GND, buffer with 10nF cap)
Pin 4 : GND
Pin 5 : PB0 - TX key line (polarity configurable)
Pin 6 : PB1 - Sidetone (Connect a piezo disc)
Pin 7 : PB2 - Command button (towards GND)
Pin 8 : VCC (5V)

Usage
After reset in default mode, the keyer operates as regular IAMBIC keyer in IAMBIC B at 12 WPM (words per minute = 60 CPM). The sidetone generator operates at 800 Hz.

Speed Change : speed can be changed py pressing and holding the command key while operating the DIT and DAH paddles. DIT reduces speed while DAH increases speed. The keyer plays an alternating sequence of dit and dah while changing speed without keying the transmitter.

Command mode
Pressing the command button without changing speed will switch the keyer into command mode. This will be confirmed with the '?' character. Another press of the same button takes the keyer back into regular keyer mode and will be confirmed by a "C".

During command mode the transceiver is never keyed and sidetone is always activated. Further functions can be accessed by keying one-letter commands as listed below.

A - IAMBIC A
Keyer sets IAMBIC A as permanent keying mode. Request is answered with "R".

B - IAMBIC B
Keyer sets IAMBIC B as permanent keying mode. Request is answered with "R".

C - Callsign trainer
The keyer plays a generated callsign (sidetone only) and the user must repeat it. If it was repeated correctly, "R" is played and the next callsign is given. If a mistake was sensed, the error prosign (8 dots) is sounded and the current callsign is repeated again for the user to try once more. If nothing is keyed for 10 seconds, the keyer returns to command mode.

D - DAH priority mode.
In squeezed state a sequence of DAHs is sent.Some of the first generation keyers exhibited this behaviour so the chip can simulate that.

E, I , T, M - Play back internal messages 1, 2, 3 or 4
The stored messages 1 - 4 are played back with keying enabled (if configured). A press of the command key immediately returns the keyer to keyer mode so a QSO can be started.

I - TX level inverter toggle
This function toggles wether the "active" level on the keyer output is VCC or GND. This setting is dependent on the attached keying circuit. Request is answered with "OK".

K - TX Keying toggle
Toggles the setting of the TX keyer output. In default state the keyer switches the output line when it is in keyer mode. Toggling this setting enables or disables that function. NOTE: Keying is always off in Command mode. Request is answered with "OK".

L - Ultimatic
Sets the keyer into ULTIMATIC mode. In Ultimatic mode always tha last paddle to be touched is repeated indefinitely when paddles are squeezed

N - Automatic Beacon
The keyer responds with "N" after which a number between 0 and 9999 can be keyed. After a 5 second timeout the keyer responds by repeating the number and "OK". Once the keyer returns to keyer mode, the content of message buffer 2 is repeated in intervals of n seconds. The setting is preserved in EEPROM so the chip can be used as a fox hunt keyer.
Returning to command mode and entering an interval of 0 (or none at all) stops beacon mode.

P - Pitch
Allows modifying the sidetone pitch to a higher or lower level. This function implements pitch change mode. A series of dots is played and pitch can be adjusted using the paddle levers. Once 10 dots have been played at the same pitch, the mode terminates.

R - Reset
All settings are returned to their default values except for the stored messages in the message buffers. Restored settings include speed and pitch, Paddle Swap, TX level inversion, sidetone and TX keyer settings.

S - Sidetone toggle
The builtin sidetone generator setting is toggled (ON -> OFF or OFF -> ON). NOTE: This setting is only of relevance for regular keying mode. Sidetone is always on in command mode. Request is answered with "OK".

U - Tune mode
The transceiver is keyed for a duration of 20 seconds for tuning purposes. Tuning mode is aborted once either DIT or DAH paddles are touched or the control key is pressed.

V - Version
The keyer responds with the current keyer software version number

W - Query current WPM speed
Keyer responds with current keying speed in WPM.

X - Paddle swapping
DIT and DAH paddles are swapped. Request is answered with "OK".

Z - Set Farnsworth pause
Allows setting of an extended inter-character Pause in all sending modes which makes fast keying easier to understand. Note that this of course only influences RECEPTION, not TRANSMISSION. If you desire farnsworth mode in transmission, please manually pause during characters.

0 - Lock configuration
The 0 command locks or unlocks the main configuration items but not speed, pitch and playback functions.

1, 2, 3 or 4 - Record internal messages 1 or 2 or 3 or 4 – BEACON message is message 2
The keyer immediately responds with "1" or "2" or “3” or “4” after which a message up to 100 characters can be keyed at current WPM speed. After 5 seconds of inactivity the message is stored in EEPROM. If entering message is interrupted with command button, keyer returns "R" and stays in command mode.  Memory is unchanged. Choosing "1" or "2" or “3” or “4” but not keying a new message deletes the chosen message buffer content.


02/07/2024

ON7DQ Friedrichshafen 2024 - Day 13

This day saw some 240 km of driving, one last SOTA activation ...and rain again !

FL/VO-023, Le Donon - 1007m, 10 points

I activated this summit on my own last year, and liked the rather tough mountain walk over a cobbly track. So I wanted to take the XYL on the same experience ... it don't have to be drive-up summits all the time, right ?


See my previous report for the parking spot and how to get there.

Last year I had beautiful weather, not so this time. During the walk to the summit it was more or less dry, with a very light drizzle coming up when we approached the summit.
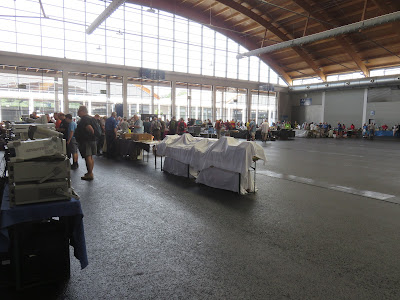
I quickly set up my station, but already feeling more and more rain, I chose an operating spot inside "The Temple", there were only a few visitors anyway. I couldn't find a good place to put the spike for my fishing pole, so my antenna was sagging and hanging low above the ground, but it seemd to still work ok.


Sitting behind a pillar, and at the right angle, I could protect myself and the rig more or less.


Considering the circumstances, the activation went well. With 13 QSO's and two S2S in the log, this concluded the SOTA tour.  


After a wet descent, we decided not to activate the closeby summit of Le Petit Donon, and drove to our last AirBnb in Pont-a-Mousson. There was no rain there, so we enjoyed the last evening of our trip at the borders of the Moselle river ... and with a view of nearby summit Butte de Mousson FL/VO-060.


This was the last post of this trip. Day 14 was just driving home, nothing special to report.
Thanks for reading, and see you on another SOTA trip soon !

73 de Luc, ON7DQ & XYL Karine


Go back to overview HERE


01/07/2024

ON7DQ Friedrichshafen 2024 - Day 12

 Triberg Waterfalls


Proudly presented as "Deutschlands Höhste Wasserfälle" with a height of 163m ... that is if you sum up the height of seven small water chutes along the way ... none of those are actually spectacular.

We parked here 48.123249, 8.222143 (Parkplatz Adelheid), but there are several other entry points where you can park and start your visit.

With a 3.75€ parking fee, and another 8€ per person to get into the park, this looks a bit like a tourist trap ... but it's still a nice day out, and the whole place is well maintained. 


At midday, we had our lunch on the parking lot near the car. The weather looked nice enough to have a second attempt to activate Kandel. So off we went ...

DM/BW-009, Kandel - 1241m, 10 points
DA-0004 Südschwarzwald Nature Park

When we arrived at the parking for Kandel (pos 48.065336, 8.016146), it was cloudy but still dry. 


But just as I was setting up, it started raining, so I had to move all my stuff up in the watchtower. I still had to set up my antenna, in the pouring rain, so by the time I got under the roof, I was already quite wet. 


I tried to keep the equipment dry with a towel and the plastic cover of my Go-Box. 


But the situation was getting worse, the wind was sweeping the rain under the roof, so I had to keep the activation very short and abandon ship after only 5 QSO's, just enough to have a valid activation. Not even one S2S this time, oh well ... 


Driving down from the summit was a bit dangerous, the visibility was very bad, but we made it safely  back to our Bnb.

Continue reading ... go to DAY 13

or

Go back to overview HERE

30/06/2024

ON7DQ Friedrichshafen 2024 - Day 11

This day, we left Friedrichshafen, our final destination was Teningen near Freiburg im Breisgau.
First, we visited the largest fortress ruins in Germany, the Hohentwiel Castle

(source https://www.festungsruine-hohentwiel.de/en/)

DM/BW-101, Hohentwiel - 690m, 6 Points

The parking for the castle is here 47.766977, 8.818272

We had some trouble getting there, because there was a cycling race going on in Singen, so we made a large detour to finally get to the access road to the parking.
Entrance fee was still 5€/person like last year, tickets must be bought in the info center near the parking, no tickets are sold at the entrance gate to the castle. Note that you can not activate this summit other than by being inside the castle walls.

From the info center, it is about 25 minutes to the castle, not too difficult but steep in some places, take enough water on a hot day!

Don't miss the graveyard at the start of the walk, it has a special atmosphere.


I had done the castle visit last year, so this time I set up my station as quickly as possible, and  let the XYL enjoy the views, and take some pictures.

This time, I set up in plain view of all the visitors, in the center field, where there are two nice picnic benches. No one made a problem of my presence. 

From the summit, you have a nice view of the other two "Hegau volcanoes", Hohenstoffeln, DM/BW-085 (left) and Hohenwewen, DM/BW-086 (right), which I have activated in 2019 (see that report here).


I spent more than an hour on the summit, resulting in 28 QSO's with an incredible 10 S2S !
Conditions were so-and-so the whole trip, so again no DX on the map.


Another view of the nice location of my outdoor shack ...


I had planned to also activate Kandel, DM/BW-009, but had to cancel because the rain was pouring by the time we got near the summit. Visibility was very bad so we just went looking for our AirBnb, and that was it.

Continue reading ... go to DAY 12

or

Go back to overview HERE

29/06/2024

ON7DQ Friedrichshafen 2024 - Day 10

The Ham Radio, the SOTA meeting, a SOTA presentation by KF0CR ... AND a SOTA activation!


Ham Radio


I had only bought a ticket for the Saturday, so I had to divide my time between all offerings on the fair.
I first visited the flea market, which was again reduced in size compared to last time. All stands together barely filled one hall, where it used to be two fully populated halls.


The second hall ... those few tables could easliy have been put in the first hall, where there was also lots of empty space. 


My only purchases were a set of large crocodile clips, and a Czech Army key.


After that it was time to have a quick visit to the main hall, and of course, my first stop was the combined QRP Labs/ Palm Radio Keys stand.


As a CW fan, I liked this display of CW keys.


A brief visit at the SOTA stand, where Michael DB7MM was showing a novel base for your CW paddle.


I also wanted a new hat, so I had one made with my name and callsign on it, and of course it had to be in my favourite color : ORANGE !
Not cheap at 30€, but doesn't it look great ?

*** pic to follow

The SOTA Meeting


Lots of familiar faces in the room "Austria", I won't even try to put names and callsigns ... I would forget too many. After the presentation of the Elecraft KH1 by Eric WA6HHQ came my moment of glory ...

Presentation by KF0CR : SOTA fun in the USA

I made a trip to the USA in 2015, which actually was the start of this blog (see that report here).

I offered to give a short presentation about this adventure to Juerg, HB9BIN, when he was still organizing the SOTA meeting, but there was never an opportunity. So, after Sylvia, OE5YYN, took over the job, I offerd her the same, but also had to wait a few years ... until this year, there seemed to be a shortage of speakers, so now was my chance.

I had asked Sylvia to leave out my name and home call, so it would be a surprise to most who would be this speaker... hi.

So after 9 years, I could finally show some slides and a short video about how my SOTA adventure in 2015 went along. Also in my presentation, a visit to the OzarkCon QRP conference which takes place each year in Branson, Missouri (see that report here).  

The video I showed can be seen on my Youtube channel here

After my presentation, there were two more, one by Markus HB9DIZ, and one by Dzianis DD1LD.
But I had to leave the meeting a bit early, my XYL had been alone the whole day, and I promised her a dinner with a bit less people around ...
But before the dinner we still had time for a short visit to a popular and easy summit ... she's married to ham and she'll know it, hi!

DM/BW-854, Höchsten - 838m, 8 Points


Not much to tell here, see my previous report for info. I made 14 QSO's with 3 S2S. One of the S2S was with Phil, G4OBK on 10m.


And that concludes my report on a very busy day !

Tomorrow , we leave Friedrichshafen, in the direction of the "Schwarzwald" ...


Continue reading ... go to DAY 11

or

Go back to overview HERE

28/06/2024

ON7DQ Friedrichshafen 2024 - Day 9

A brief visit of Friedrichshafen ...and the SOTA Dinner !


We started the day with a visit to Friedrichshafen, for some shopping and sightseeing. Amongst other things, we climbed the "Moleturm", a nice lookout tower at the Bodensee. Gets you a nice view of the ferryboats and the Zeppelin museum.

In the evening, there was the SOTA Dinner in the same restaurant as last year, Gasthof Adler in Hefigkofen. 70 guests attended the dinner, it was great to see so many familiar (and some unfamiliar) faces. Let the pictures speak for themselves ...


After the dinner, my XYL and myself were in for a big surprise ... 
As we were recently married, Ludwig DH8WN came to us to hand us a "wedding present".
It was an old vacuum tube, a Tesla E88CC (a copy of a Siemens ECC88).
Ludwig told me a whole story about how the properties of this tube (gold contacts among other things) would ensure us a long and happy marriage. Thanks Ludwig ! 


And that was not all, the present was accompanied by some harmonica music by Uli, DC1UH


This will be a SOTA Dinner that is not easily forgotten !

Continue reading on DAY 10

or

Go back to overview HERE